
Top 10 Ways to Propagate African Violets Like a Professional: The world of African Violets is full of beauty and vibrant colors, and their propagation is a rewarding experience for any plant enthusiast. From leaf cuttings to seed sowing, there are a multitude of methods to expand your collection and enjoy these stunning blooms.
This guide will equip you with the knowledge and techniques used by professional growers, enabling you to cultivate new African Violet plants with confidence and success.
Whether you’re a seasoned gardener or just starting out, this comprehensive guide will lead you through each step of the propagation process. We’ll explore the secrets to creating the ideal environment for rooting and growth, delve into different propagation methods, and address common issues you might encounter along the way.
By following these expert tips and techniques, you’ll be well on your way to becoming a true African Violet propagation pro.
Leaf Cutting Propagation
Leaf cutting propagation is a popular and successful method for multiplying African violets. This technique involves taking a healthy leaf from a mature plant and encouraging it to develop roots and a new plant.
Selecting and Preparing a Leaf Cutting
Leaf cuttings should be taken from healthy, mature plants that are free of pests and diseases. The ideal leaf cutting is a healthy, fully developed leaf with a long petiole (the stalk that attaches the leaf to the plant). Avoid using leaves that are damaged, discolored, or have signs of pests or disease.
- Use a sharp, clean blade to make a clean cut at the base of the leaf, just below the petiole. A sharp blade will minimize damage to the leaf and reduce the risk of infection.
- After removing the leaf cutting, remove any excess leaves or buds from the bottom inch or two of the petiole. This will help to prevent rot and encourage root development.
- Make a shallow cut at the base of the petiole, about a quarter of an inch deep. This will help to stimulate root growth.
Soil and Potting Mix for Success
Choosing the right soil or potting mix is crucial for African Violet propagation. The ideal mix should provide excellent drainage, aeration, and the right pH level to support healthy root development.
Soil Composition and Drainage
The best soil for African Violet propagation is a well-draining mix that allows excess water to escape quickly. This prevents the roots from sitting in soggy soil, which can lead to root rot and other problems. A well-draining mix typically contains a combination of ingredients like:
- Perlite: This lightweight material improves aeration and drainage, helping to prevent compaction.
- Vermiculite: This mineral provides moisture retention and helps to create a stable soil structure.
- Peat Moss: This material adds acidity to the soil, which African Violets prefer, and also helps to retain moisture.
- Coco Coir: This sustainable material is a good source of nutrients and also helps to improve drainage and aeration.
Importance of pH Level
African Violets thrive in slightly acidic soil with a pH range of 6.0 to 6.5. This pH level helps to ensure that the plants can absorb essential nutrients from the soil.
A pH of 6.0 to 6.5 provides the optimal environment for nutrient uptake and root development.
Sterilization for Disease Prevention
Using sterilized soil or potting mix is crucial to prevent the spread of diseases and pests. These pathogens can be present in untreated soil and can easily infect your cuttings, leading to stunted growth or even death.
- Microwave Sterilization: Place the soil or potting mix in a microwave-safe container and heat it for 1-2 minutes, depending on the volume. This kills most harmful organisms.
- Oven Sterilization: Preheat the oven to 200°F (93°C). Spread the soil or potting mix in a baking dish and bake for 30 minutes. This method is effective for larger quantities of soil.
Creating the Perfect Environment
Providing the ideal conditions for African violet leaf cuttings to root and thrive is crucial for successful propagation. This involves replicating the natural environment where these plants flourish, ensuring they have the necessary temperature, humidity, and light exposure.
Ideal Temperature and Humidity Levels, Top 10 Ways to Propagate African Violets Like a Professional
Maintaining a stable temperature and humidity level is essential for African violet propagation. The ideal temperature range for rooting is between 70-75°F (21-24°C). This temperature promotes healthy root growth without stressing the cuttings. However, temperatures below 65°F (18°C) can significantly slow down root development, and temperatures above 80°F (27°C) can lead to wilting and damage.
Humidity is equally important. African violets prefer a humid environment, and maintaining humidity levels above 50% is ideal for propagation. Low humidity can cause the cuttings to dry out, hindering root development. A humid environment helps retain moisture, ensuring the cuttings have adequate water for root growth.
Indirect Sunlight and Direct Sun Exposure
African violets thrive in bright, indirect light, but direct sunlight can be harmful. Direct sunlight can scorch the leaves and damage the cuttings. Therefore, placing the cuttings in a location that receives bright, indirect light is crucial for successful propagation.A south-facing window is often ideal for providing adequate indirect light.
However, during the hottest part of the day, it’s essential to provide shade or move the cuttings to a location with less direct sunlight.
Creating a Humid Environment
Creating a humid environment is essential for African violet propagation. This can be achieved using various methods:
- Propagation Dome:A propagation dome is a clear plastic dome placed over the cuttings, trapping moisture and creating a humid environment. This is a highly effective method for maintaining humidity levels.
- Plastic Wrap:Using a clear plastic wrap to cover the cuttings can also create a humid environment. This method is less expensive than a propagation dome but requires careful monitoring to prevent condensation buildup.
- Humidifier:Placing a humidifier near the cuttings can increase humidity levels. This method is particularly useful in dry climates or during winter months.
By creating a humid environment, you ensure the cuttings have the optimal moisture levels for healthy root development.
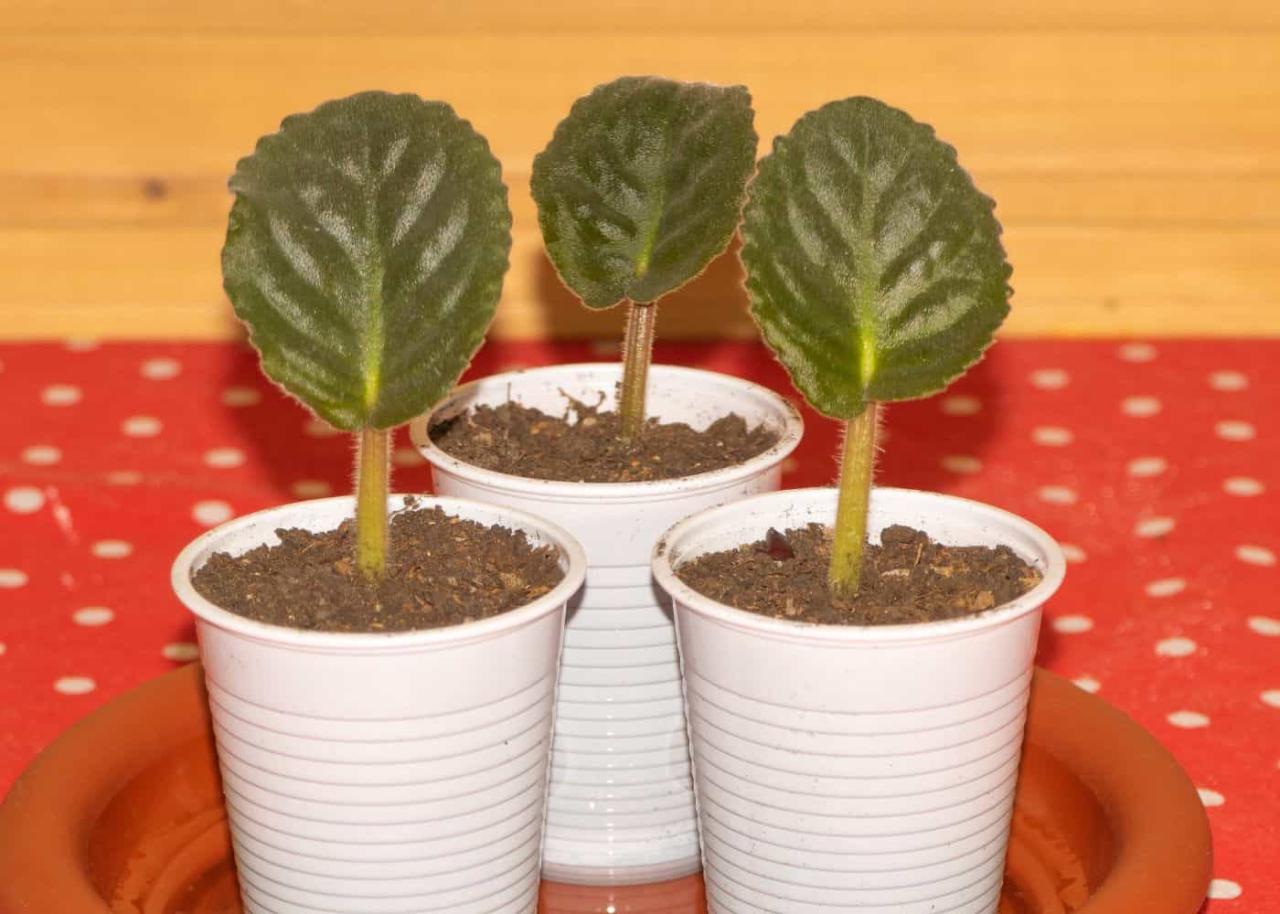
Planting and Rooting Techniques

Once you’ve prepared your soil and cuttings, it’s time to plant them and create the perfect environment for root development. This process involves choosing the right pot, planting depth, and spacing to ensure optimal growth.
Planting Leaf Cuttings
Planting leaf cuttings is a crucial step in the propagation process. This section will provide a step-by-step guide on planting leaf cuttings in the prepared soil, ensuring optimal root development.
- Prepare the pot:Choose a small pot with drainage holes to prevent waterlogging. Fill the pot with the prepared soil mix, leaving about an inch of space at the top.
- Make a hole:Use a pencil or your finger to create a hole in the center of the pot, about 1-2 inches deep.
- Insert the cutting:Gently insert the leaf cutting into the hole, ensuring that the cut end is fully submerged in the soil.
- Firm the soil:Lightly press the soil around the base of the cutting to secure it in place.
- Water gently:Water the soil thoroughly, ensuring that the entire root ball is moistened.
- Place in a warm location:Place the pot in a warm, bright location, but avoid direct sunlight.
Proper Depth and Spacing
The depth and spacing of the leaf cuttings play a crucial role in root development. Planting too deep can suffocate the cutting, while planting too shallow can make it unstable.
The ideal depth for planting African violet leaf cuttings is about 1-2 inches deep, with the cut end fully submerged in the soil.
Spacing the cuttings about 2-3 inches apart will allow for proper air circulation and prevent overcrowding.
Rooting Techniques
Several techniques can be used to encourage root development in African violet leaf cuttings. These techniques include water propagation and using rooting hormone.
Looking to expand your African violet collection? Mastering propagation techniques is key. Our “Top 10 Ways to Propagate African Violets Like a Professional” guide covers everything from leaf cuttings to division, but for a deeper dive into the intricacies of successful propagation, check out our comprehensive guide, African Violet Propagation Done Right: A Comprehensive Guide.
With the right knowledge and techniques, you’ll be a pro at propagating these beautiful plants in no time!
Water Propagation
Water propagation is a simple and effective method for rooting African violet leaf cuttings. This technique involves placing the cuttings in a glass of water and allowing them to develop roots.
- Fill a glass with water:Use a clean glass and fill it with room temperature water.
- Place the cutting in the water:Place the leaf cutting in the water, ensuring that the cut end is submerged.
- Change the water regularly:Change the water every few days to prevent the growth of bacteria and algae.
- Monitor for root development:Observe the cutting for root development. Roots should appear within a few weeks.
- Transfer to soil:Once the roots are about an inch long, gently transfer the cutting to a pot filled with the prepared soil mix.
Rooting Hormone
Rooting hormone is a chemical compound that promotes root development in plants. It can be used to speed up the rooting process and increase the success rate of propagation.
- Dip the cut end in rooting hormone:Dip the cut end of the leaf cutting in the rooting hormone powder or liquid.
- Plant the cutting:Plant the cutting in the prepared soil mix, ensuring that the cut end is fully submerged.
- Water gently:Water the soil thoroughly, ensuring that the entire root ball is moistened.
- Place in a warm location:Place the pot in a warm, bright location, but avoid direct sunlight.
Monitoring and Caring for New Growth: Top 10 Ways To Propagate African Violets Like A Professional
Once you’ve successfully rooted your African Violet leaf cuttings, the next step is to nurture their growth and ensure they thrive. Monitoring the progress of your new plants is crucial for identifying any issues and providing the right care to promote healthy development.
Signs of Root Development and New Growth
Regularly checking for signs of root development and new growth is essential for ensuring your African Violet cuttings are thriving.
- Root Development:The first indication of successful rooting is the appearance of new roots. These will be small and delicate, initially appearing as white or light-colored threads. You may be able to see these roots through the drainage holes of the pot or by gently lifting the cutting to check the bottom of the rooting medium.
- New Growth:As the roots develop, new growth will begin to emerge from the leaf cutting. This can take the form of new leaves, which will be smaller than mature leaves, or even tiny plantlets that form directly on the leaf.
Maintaining Consistent Humidity and Temperature Levels
African Violets thrive in warm, humid environments. Maintaining consistent humidity and temperature levels is crucial for healthy growth.
- Humidity:African Violets prefer a relative humidity level of 50-60%. You can increase humidity by placing the pots on a tray filled with pebbles and water, or by using a humidifier.
- Temperature:African Violets grow best in temperatures between 65-75°F (18-24°C). Avoid placing them in direct sunlight or near drafts, as these can cause fluctuations in temperature and damage the plants.
Watering and Fertilizing Young African Violet Plants
Watering and fertilizing young African Violet plants is essential for promoting healthy growth.
- Watering:Young African Violet plants need consistent moisture but are also susceptible to root rot. Water thoroughly when the top inch of soil is dry, allowing excess water to drain. Avoid overwatering, as this can lead to root problems.
- Fertilizing:Young African Violet plants require a balanced fertilizer, but use a diluted solution. Start with a weak solution and gradually increase the concentration as the plants mature. Apply fertilizer every 2-3 weeks during the growing season.
Transplanting and Acclimatization
Once your African violet cuttings have developed healthy roots, it’s time to transplant them into individual pots and introduce them to their new environment. This process involves carefully moving the young plants to their permanent homes and gradually acclimating them to the conditions they will thrive in.
Transplanting Rooted Cuttings
Transplanting rooted cuttings involves carefully moving them from their propagation environment to individual pots, providing them with the space and resources they need to grow and flourish. Here’s a step-by-step guide:
- Prepare the Pots:Select pots that are slightly larger than the root ball of the cuttings, allowing for room for growth. Ensure the pots have drainage holes to prevent waterlogging. Fill the pots with a well-draining potting mix specifically formulated for African violets.
- Gently Remove Cuttings:Carefully remove the rooted cuttings from their propagation medium, taking care not to damage the delicate roots. You can gently loosen the medium around the roots or use a small trowel to help release the cuttings.
- Position in the Pot:Place the cuttings in the center of the new pot, ensuring that the crown (the point where the leaves emerge) is slightly above the soil level. Backfill the pot with potting mix, gently pressing it around the roots to secure the plant.
- Water Thoroughly:Water the newly transplanted cuttings thoroughly, ensuring the entire root ball is moistened. Allow excess water to drain through the drainage holes.
Importance of Gradual Acclimatization
Acclimatizing African violet cuttings to their new environment is crucial for their successful transition. Sudden changes in light, humidity, and temperature can stress the young plants, hindering their growth. Gradual acclimatization allows them to adjust gradually, minimizing shock and promoting healthy development.
Adjusting Watering and Fertilization Schedules
Newly transplanted African violets require careful watering and fertilization to ensure they receive the necessary nutrients and moisture for optimal growth.
- Watering:Water the transplanted cuttings sparingly, allowing the top inch of soil to dry out between waterings. Avoid overwatering, as it can lead to root rot. Monitor the soil moisture regularly and adjust watering frequency as needed.
- Fertilization:Hold off on fertilizing for the first few weeks after transplanting. Once the plants have settled into their new pots and show signs of active growth, you can begin fertilizing with a diluted, balanced fertilizer specifically formulated for African violets.
Apply the fertilizer every 2-4 weeks, following the manufacturer’s instructions.
Division Propagation
Division propagation is a method used to multiply African violets by separating a mature plant into multiple divisions. This technique is particularly effective for plants that have grown large and overcrowded, allowing you to create new plants from the existing ones.
Dividing a Mature African Violet Plant
Dividing a mature African Violet plant involves carefully separating the plant into individual divisions, each containing its own root system and foliage. This process allows you to create multiple new plants from a single parent plant, preserving its genetic characteristics.
- Choose the Right Time: The ideal time for division is during the spring or early summer when the plant is actively growing. This allows the divisions to establish new roots and foliage quickly.
- Prepare the Plant: Before dividing the plant, gently remove it from its pot. Carefully loosen the soil around the roots and gently separate the plant into individual divisions. Each division should have a healthy root system and at least a few leaves.
- Separate the Plant: To separate the plant, carefully use your fingers or a sharp knife to divide the plant into individual divisions. Ensure each division has its own set of roots and leaves.
- Repot the Divisions: Once the divisions are separated, pot them individually in small pots filled with a well-draining potting mix.
Water the divisions thoroughly and place them in a bright, indirect light location.
Seed Propagation
Seed propagation, while a bit more time-consuming than other methods, offers a unique opportunity to cultivate new African Violet varieties. This method involves collecting and sowing seeds, carefully nurturing them to maturity.
Collecting and Sowing Seeds
The process of collecting and sowing African Violet seeds requires meticulous attention to detail. It’s crucial to utilize fresh seeds for optimal germination rates, as they lose viability quickly.
- Harvesting Seeds:African Violets produce tiny seeds within their seed capsules. Once the capsules have turned brown and dry, carefully cut them open and collect the seeds.
- Seed Storage:Store the collected seeds in a cool, dry, and dark environment. It’s recommended to use airtight containers to prevent moisture absorption.
- Sowing Seeds:Use a seed starting mix that’s specifically formulated for fine seeds. Fill a shallow seed tray or pot with the mix and lightly press the seeds onto the surface. Do not cover the seeds with soil, as they require light for germination.
Creating the Ideal Environment
To encourage successful germination, it’s essential to provide a controlled environment that mimics the natural conditions preferred by African Violet seeds.
- Light:African Violet seeds need bright, indirect light. Avoid direct sunlight, which can scorch the seedlings.
- Temperature:The ideal temperature for germination is between 70°F and 75°F (21°C and 24°C).
- Humidity:Maintaining high humidity is crucial for germination. You can create a humid environment by covering the seed tray or pot with a clear plastic dome or by placing it in a propagator.
Germination and Seedling Care
With proper care, African Violet seeds will begin to germinate within a few weeks. Once seedlings emerge, continue to provide them with the necessary conditions for healthy growth.
- Watering:Keep the seed starting mix consistently moist, but avoid overwatering, which can lead to root rot.
- Light:As the seedlings grow, gradually increase the amount of light they receive, but avoid direct sunlight.
- Ventilation:Once the seedlings have developed a few true leaves, start to gradually introduce more ventilation to prevent fungal diseases.
Troubleshooting Common Issues
Even with the best care, African Violet propagation can sometimes encounter difficulties. Identifying and addressing these issues promptly is crucial for successful propagation. Common problems include root rot, fungal infections, and pest infestations. By understanding the causes and implementing preventive measures, you can minimize these challenges and maximize your chances of success.
Root Rot
Root rot is a common problem that can occur when African Violet cuttings are overwatered or planted in poorly draining soil. The excess moisture creates an environment conducive to fungal growth, which can damage or destroy the roots.
- Symptoms:Soft, mushy roots, a foul odor, wilting leaves, and stunted growth are signs of root rot.
- Solutions:If root rot is detected, remove the cutting from the soil and inspect the roots. Trim away any damaged or rotted roots with a sharp, sterilized knife. Repot the cutting in fresh, well-draining soil. Allow the soil to dry out slightly between waterings to prevent further root rot.
Our “Top 10 Ways to Propagate African Violets Like a Professional” guide will help you master the art of creating new plants. But before you dive into specific techniques, understanding the fundamentals of propagation is crucial. For a comprehensive overview of the latest methods and essential tips, check out our detailed article, Propagating African Violets in 2024: What You Need to Know.
This knowledge will equip you with the foundation to confidently implement our “Top 10 Ways” and become a true African Violet propagation expert.
- Prevention:To prevent root rot, use a well-draining potting mix and avoid overwatering. Ensure the pot has drainage holes to allow excess water to escape. Water only when the top inch of soil is dry.
Fungal Infections
Fungal infections can affect African Violet cuttings, causing leaf spots, powdery mildew, or other symptoms. These infections often thrive in humid environments and can spread quickly.
- Symptoms:Leaf spots, powdery mildew, black mold, and other discoloration on leaves and stems.
- Solutions:Remove any infected leaves or stems to prevent the spread of the infection. Treat the cutting with a fungicide specifically designed for African Violets. Improve air circulation around the cutting to reduce humidity.
- Prevention:Maintain a clean and sterile environment for propagation. Use sterilized tools and pots to prevent the spread of fungal spores. Avoid overwatering and ensure good air circulation around the cuttings.
Pest Infestations
African Violet cuttings can be susceptible to various pests, including aphids, mealybugs, and spider mites. These pests can damage the leaves, stems, and roots, hindering growth.
- Symptoms:Small insects, sticky residues, webbing, and discoloration on leaves and stems.
- Solutions:Identify the pest and use an appropriate insecticide to treat the infestation. Regularly inspect the cuttings for signs of pests and isolate any infected cuttings to prevent the spread.
- Prevention:Regularly inspect new cuttings for pests before introducing them to your collection. Quarantine new cuttings for a few weeks to monitor for any infestations. Keep the propagation area clean and free of debris to discourage pests.
Professional Techniques and Tips

Professional African violet propagators employ a range of advanced techniques and specialized equipment to maximize propagation success and minimize losses. These methods ensure high-quality plantlets with consistent growth and flowering potential.
Utilizing Specialized Equipment for Optimal Results
Professional growers often utilize specialized equipment to create optimal propagation conditions. This equipment helps ensure consistent environmental control and maximizes efficiency.
- Misting Systems:Automated misting systems provide consistent humidity levels, crucial for maintaining optimal leaf cutting moisture and preventing desiccation. This system minimizes manual intervention and ensures even moisture distribution.
- Heating Mats:Heating mats provide a consistent warm temperature for rooting, accelerating the rooting process and promoting faster growth. This is especially beneficial in cooler environments or during colder seasons.
- Grow Lights:Professional growers often utilize grow lights to supplement natural light, especially during winter months or when propagation occurs indoors. This ensures adequate light intensity and duration for optimal plant growth.
- Propagation Trays:Propagation trays with drainage holes and humidity domes create a controlled environment for cuttings. These trays help maintain humidity, prevent overwatering, and facilitate air circulation.
Advanced Propagation Techniques
Professional growers often utilize advanced propagation techniques to enhance success rates and produce high-quality plantlets. These techniques leverage specific knowledge and expertise to optimize growth and minimize losses.
- Leaf Venation Propagation:This technique involves taking cuttings from the veins of the leaf, promoting the development of multiple plantlets from a single leaf. This increases the number of plants obtained from a single leaf and optimizes propagation efficiency.
- Tissue Culture:This advanced technique involves growing plant cells in a sterile, controlled environment. It allows for the rapid production of large numbers of genetically identical plants. This method is particularly useful for propagating rare or desirable varieties.
- Hormone Application:Professional growers may utilize rooting hormones to stimulate root development and enhance the rooting process. This application increases the success rate of propagation, especially for difficult-to-root varieties.
Tips and Tricks for Maximizing Success
- Using Sharp, Clean Tools:Sterilize all tools with rubbing alcohol before use to prevent contamination and disease transmission.
- Selecting Healthy Leaf Cuttings:Only use healthy, mature leaves from vigorous plants. Avoid using leaves with signs of disease or damage.
- Avoiding Overwatering:Ensure the potting mix is well-draining and avoid overwatering. Excessive moisture can lead to root rot and fungal diseases.
- Providing Adequate Light:Place propagated cuttings in a bright location with indirect sunlight or under grow lights to promote healthy growth.
- Monitoring for Pests and Diseases:Regularly inspect plants for signs of pests or diseases. Treat any issues promptly to prevent spread and protect other plants.
Final Summary
Propagating African Violets is an exciting journey that allows you to share the beauty of these unique plants. By understanding the principles of leaf cutting propagation, division, and seed sowing, you can confidently cultivate new generations of African Violets.
With practice and a little patience, you’ll master the art of propagation and enjoy the rewards of witnessing these vibrant blooms thrive under your care. Remember, every successful propagation is a testament to your dedication and a celebration of the wonder of the plant world.
Questions and Answers
Can I propagate African Violets in water?
Yes, you can propagate African Violets in water. This method is known as water propagation. Simply place the leaf cutting in a jar or glass of water and change the water every few days. Roots will develop within a few weeks, after which you can transplant the rooted cutting into soil.
How long does it take for African Violet cuttings to root?
The time it takes for African Violet cuttings to root can vary depending on factors such as the method used, the environment, and the health of the cutting. Typically, it takes 4-6 weeks for leaf cuttings to develop roots.
However, some cuttings may root faster or slower depending on the specific conditions.
